
Text-based menu
You can create a menu with text-based top items. Such menu will be loaded more quickly on your website (in comparison with image-based navigation).
Menu structure is comprised of HTML nested UL and LI tags. Standards compliant menu structure is simple to customize and update.
Multilanguage User Interface (MUI)
Since the version 2.79 Vista Buttons supports the multilanguage user interface. Vista Buttons is translated into the numerous of languages such as: German, Dutch, French, Italian, Spanish, Portugues, Arabic, Polisch, Romanian, Hungarian, Bahasa Malaysia.
Embedding Dropmenu In IframeCss Drop Down Menus
Create drop down menus based on css using Vista Buttons. Make various styles for each submenu item adjusting css styles.
Add Button Java TreePadding and Spacing
Specify various values for padding and spacing for the whole menu and for each separate submenu.
How To Apply Class To Javascript
Menu Template:
Light Green Website Buttons - Rounded Corner


 |  |  |
Create Tab In Css
This menu is generated by Javascript Menu Builder.
Create your own menu now!

Create Tab In Css Screenshots


Menu, Button, and Icon Collection
Javascript Menu Builder provides huge collection of 1400 web buttons, 6600 icons, 300 ready-made samples, so you'll create really nice looking menus and buttons with little or nodesign skills at all! Web 2.0, Mac, iPhone, Aqua buttons, Vista, XP, transparent, round, glossy, metallic, 3d, tab menus, drop down menus will be a breeze!Button and Icon Samples


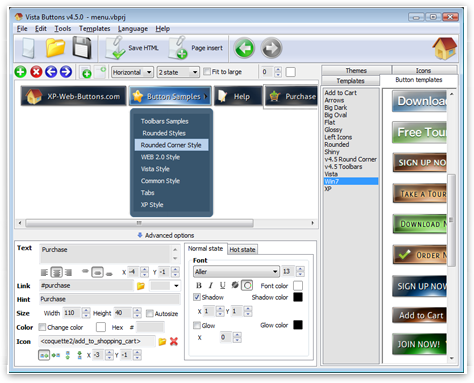
How to Use Javascript Menu Builder Menu Generator
- Let's assign text to the subitems. Select first item in the submenu by clicking it and then enter text in the "Text" field on the Properties toolbox. You will see that, as you enter the text, the selected submenu's text will change too.
Then select next item in the submenu with click. Enter its text and so on. After finishing, the menu will look like this:
- Let's change the submenu theme. To do it just select theme you like in the submenus themes list on the Themes toolbox. Then you can browse this theme's submenu backgrounds. Note, that submenu backgrounds are previewable. You can look at their behavior while choosing. Just point mouse at it to know how submenu will react.

When you find a submenu background you like, double-click it to apply. For example, after choosing one of the "blue" theme's backgrounds, we'll get following results:
- Now let's add some icons. Select submenu item and then click the "Open icon" button on the "Selected Item" tab of the "Submenus" toolbox.

"Open" dialog will appear, where you can choose an icon. Other way to assign an icon is to type its full path and name in the "Icon" field ("c:\myicons\stylish_3\pretty.ico", for example). Repeat this for each submenu item. You should get something like this in result:
- Create both horizontal and vertical menus and submenus with any amount of menus on one page. Design menus absolutely based on CSS (Cascading Style Sheets). It is possible to apply the personal CSS styles for every elements of the menu. When the submenu is bigger than the visible page area, the size of submenu will be automatically decreased. To view all the submenu you should use scrollbars.
Support
Please contact Customer Support at (please include template name in the message title)
FAQ
- "..Please provide step by step instructions on how to create and add a button for a buttons websites menu."
- "..The submenu of a menu buttons do not appear in front of a flash movie, it is allways under it. " Html Change Arrow
- "..As soon as I mouseover an item, I get a broken image icon for my buttons Xp Html."
- ".. I want to clone one of your vista button, make some changes, and save the changed button to a new theme and I'm having trouble figuring out how to do that."
- ".. I'm wondering if there is a possibility to create my own Icon Themes for the Web Design Buttons to extend the already built-in with my own icon-sets?"
- "..How can I set up Vista Buttons dreamweaver extension?"
Create Tab In Css Popular Templates


Create Tab In Css Recommended by:

Create Tab In Css Awards


Create Tab In Css Template of Day
